Use webhooks
Webhooks provide a lightweight yet powerful way to send form submissions as well as information about created, updated and deleted nodes (articles, pages and campaigns) to third party services.
What are webhooks?
For an introduction to webhooks, please read What are webhooks?, an insightful article by Zapier, a service that lets any user automate workflows, including using webhooks.
In a nutshell, webhooks allow you to connect webservices by telling webservice A (Wings) that whenevver a certain event happens, they should automatically send a bunch of data to another webservice (for example, a service like Zapier that let you decide what to do with that data.
Using webhooks has benefits:
- You will be more effective – you will simply get more done.
- Processes will be more efficient: many workflows will save you a lot of manual labor.
- Future innovation will be easier, because using webhooks allow you to connect independent best-of-breed services.
- You will save money, because you do not need to rely on expensive yet out-dated all-in-one platforms.
Webhooks examples
Here are a couple of things you may want to get done:
- "Once a user clicked the confirmation link in the Wings email they receive after filling out a Signup campaign form, send the user's data (including their first name, last name, and email address), subscribe that user to a Mailchimp Audience"
- "Once a user confirmed their petition signature, if they ticked the newsletter subscription box, add them to my Nationbuilder list"
- "If a user signs up and ticks a box saying they want to volunteer, create a card on our nonprofit's Trello board with a due date 2 days in the future, and assign the card to our volunteering coordinator Mike"
If you think about workflows like these, you may begin to understand how using them my supercharge your digital campaigning operations.
If you want to use Zapier to process newsletter subscriptions for fundraisers, petitions and events (where the user has to tick a box stating they want to get email updates), you need multi-step Zaps - because Zapier needs a filter step: all (confirmed) form submissions will get sent to Zapier, where Zapier has to check whether the newsletter subscription box is ticked. Multi-step Zaps require a paid Zapier account. See the Zapier Pricing page for more information.
What if I find webhooks too complicated?
With webhooks, you are in control over your data – and your campaign software toolkit, as it allows you to connect Wings to any system you like and automate your operations. But it can be a bit daunting, and you may not be able to set it up yourself, especially when you are short on time. A couple of notes:
- You may want to give it a try. Webhooks are an open standard, and being able to work with them will be of great benefit to any digital campaigner. You do not require any specific knowledge or skill. Carve out an hour and see if you can get it to work.
- Ask us for help at support@wings.dev.
Test webhooks
You can use a service such as webhook.site to test webhooks. You will be given a webhook url you can copy:

The, you can paste this url in the webhooks field in your Wings settings page.

If you then submit one of your campaign forms, you will see the submission with all related fields show up on webhook.site.
Use Zapier to process form submissions
We will use Zapier as an example, and we will show you how to send petition submissions to The Action Network.
1. Setup a 'catch webhook' trigger in Zapier
First, go to Zapier.com to create a Zap, with these settings:

First, we will configure the Zapier trigger, the event that sends data to Zapier, so it can do something with it.
Zapier will generate a webhook url you can copy, to paste into your Wings webhooks settings:

2. Set up the webhook in Wings
Now that Zapier has provided us with a webhook – the secure URL where it wants to receive form submissions – we have to tell Wings that certain form submissions should be sent to that location. Note: you will continue configuring our Zapier 'zap' in just a bit, so it is best to leave your Zapier browser tab open and visit your Wings project in a different tab or window.
So, go to the Settings page in your Wings project and configure a webhook:

- Go to 'Webhooks' in settings
- Choose 'Add Webhook'
- Give your webhook a name
- Paste the webhook URL you were given by Zapier
- choose which event should trigger a webhook. It is recommended to pick "confirmed.signatures" - this will fire the webhook only after a user has clicked the confirmation link in the email Wings sent to them.
- You may optionally add additional values here
- Save the webhook.
3. Submit a form
Before we continue configuring the webhook setup in Zapier Next, we need to fill out a campaign form, to fire off the webhook we just configured, so that Zapier will receive a test submission which is necessary to complete the Zapier configuration.

4. Continue configuring your Zap
If you follow the instructions in Zapier, you can test your trigger. If you have submitted and confirmed a petition form entry, Zapier should receive your information:

Click 'continue' to setup the Action.
5. Optional intermediary step: extract custom fields
If you have added custom fields to your Wings campaign and you want to process the user information that was provided by filling out these fields, you need to add an additional step, because all custom fields information is wrapped up in a single object. Think of custom fields as a number of boxes that are first put together in a single big cardboard box that needs to be unpacked first.
To do this, add a 'Formatter' action:

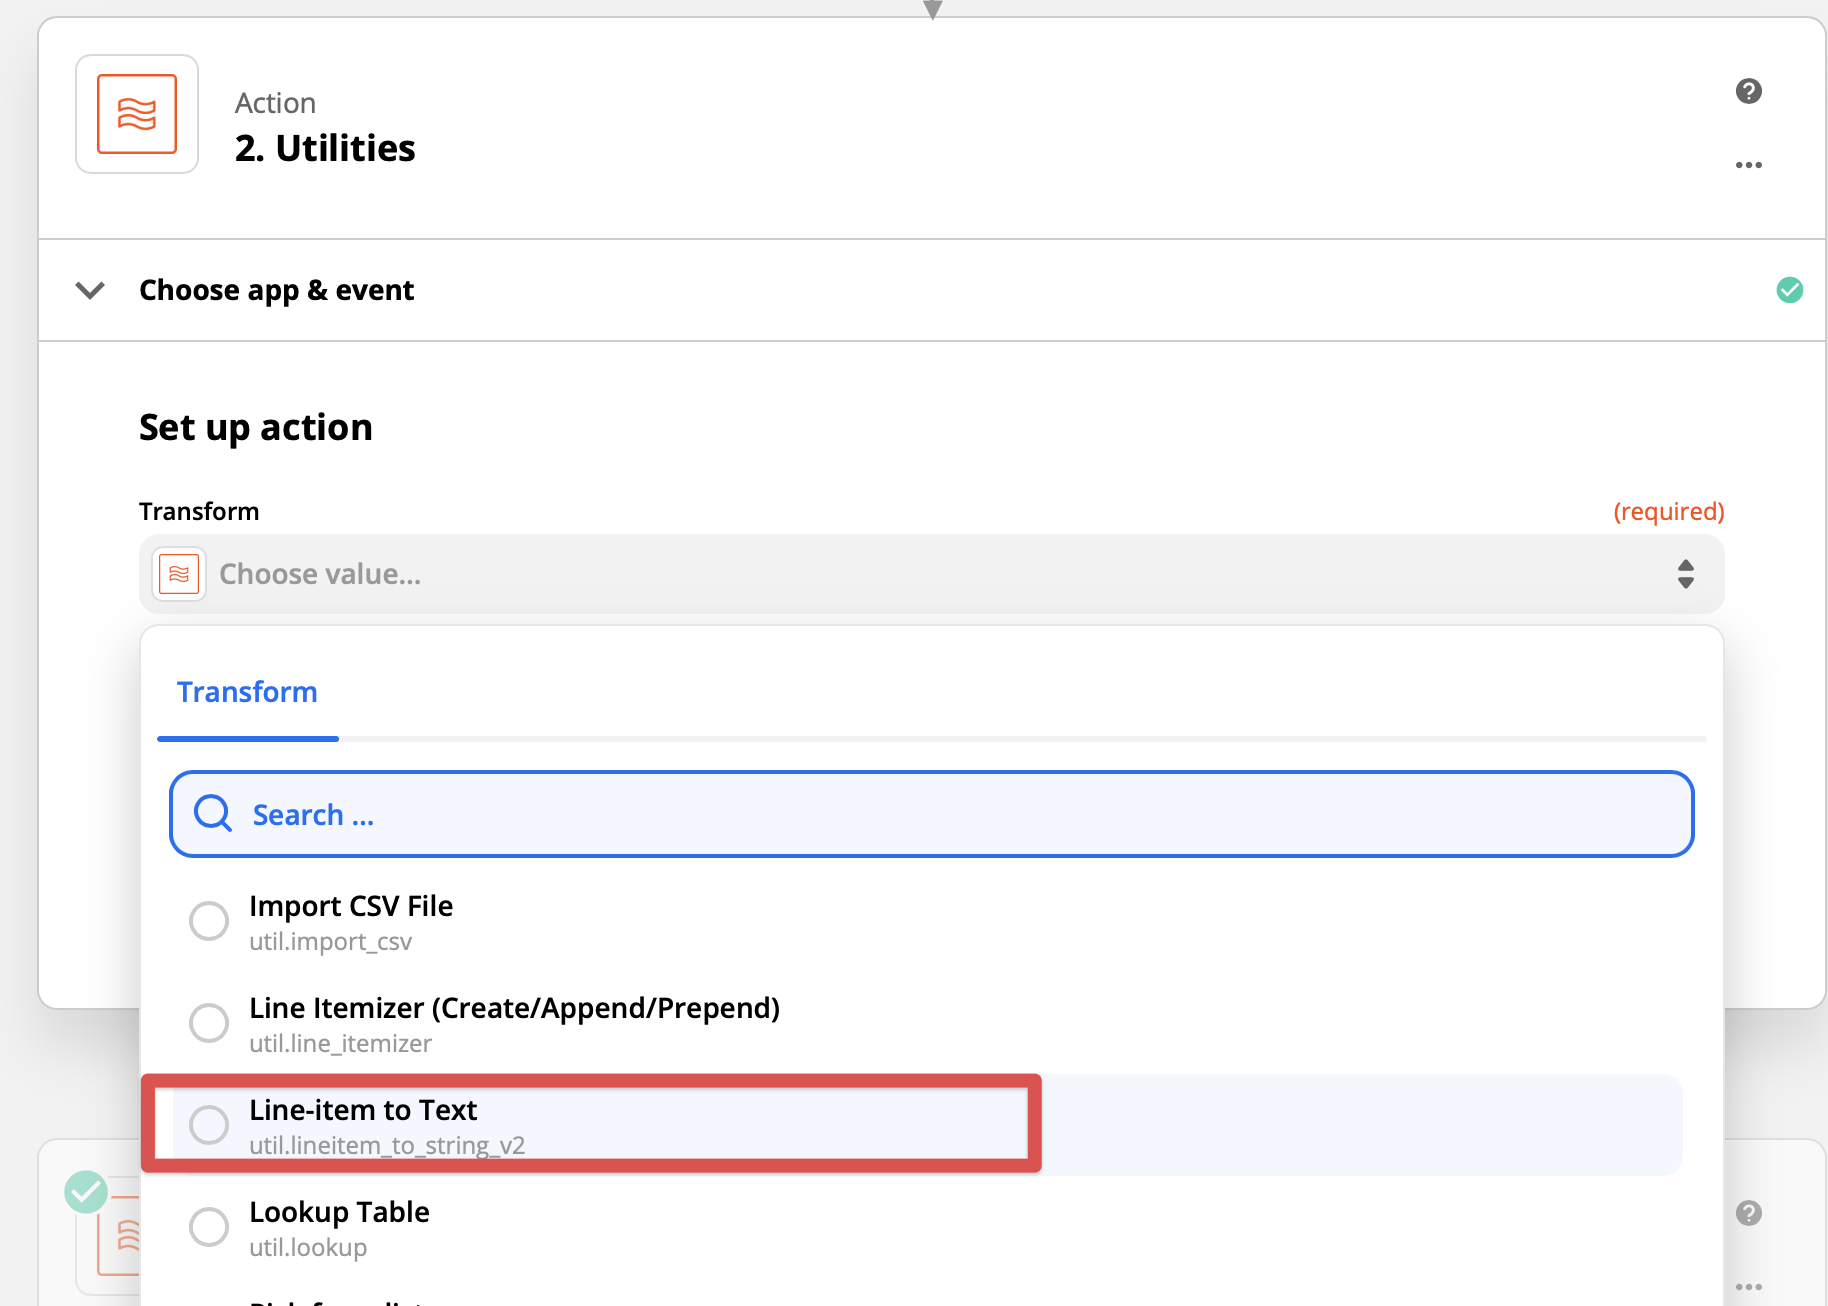
Then, pick 'Utilities' (and click 'Continue'):

Then, choose 'Line-item to text':
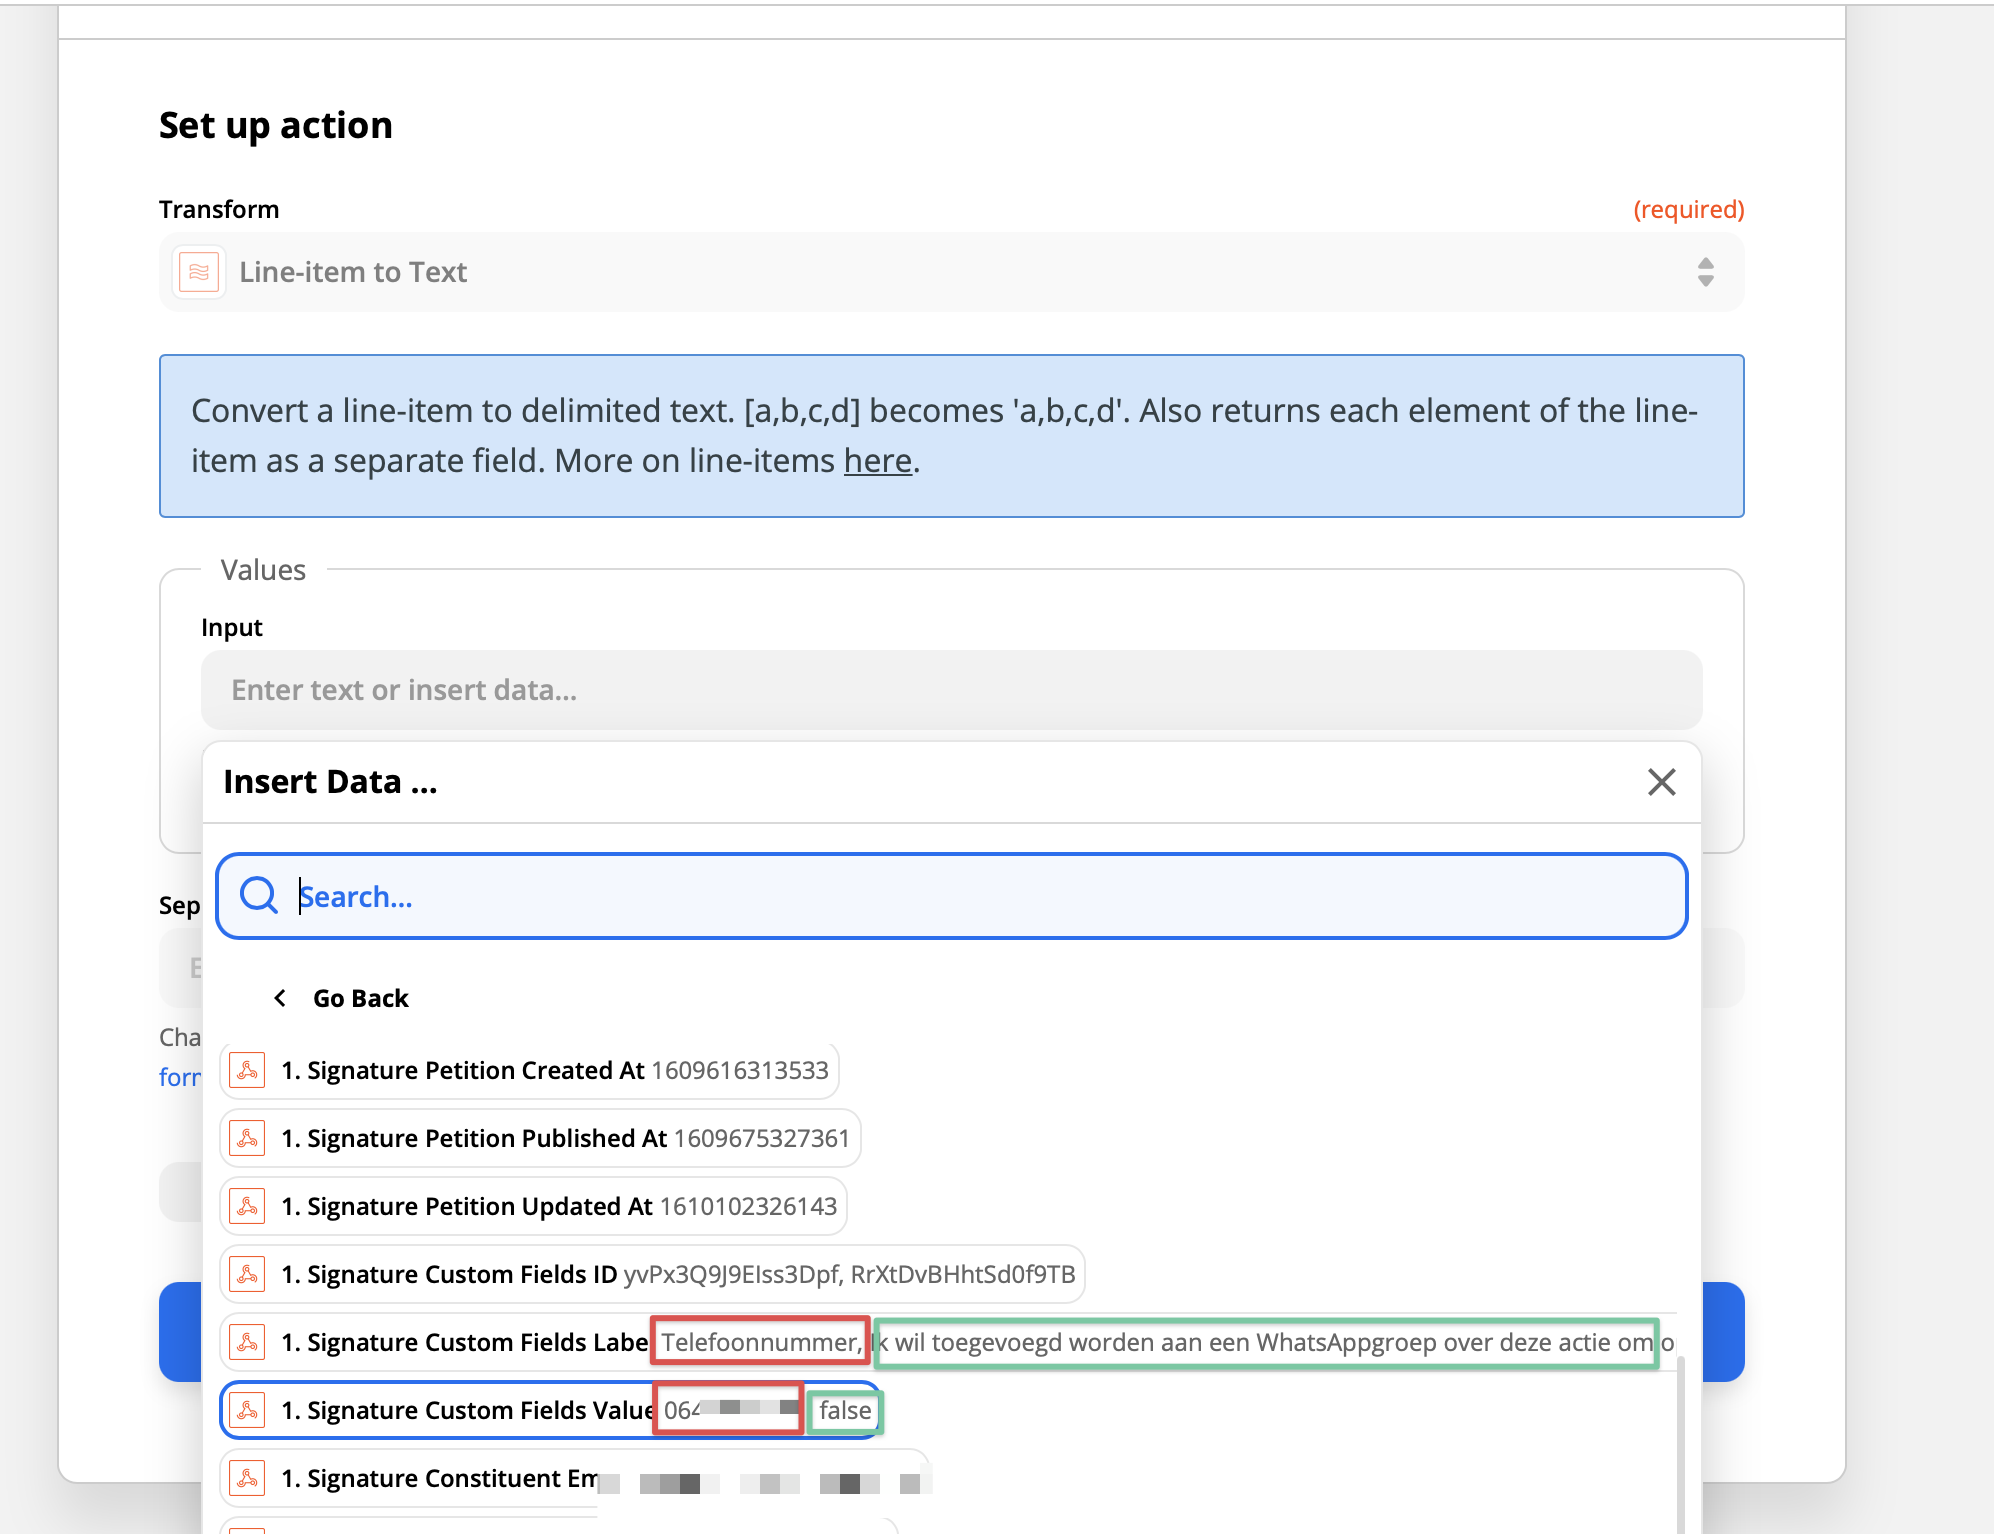
Then, we have to choose the 'Input'. Click on 'Enter text or insert data' to open a drop-down where you will see all elements of the form submission – you may have to click 'show all options'.
You will see one element that has all custom fields labels (in this case: a 'phone number' field and a checkbox label that asks if the user wants to be added to a WhatsApp Group). In the next element, both values that belong to the corresponding labels are added together (the phone number and the 'answer' to the question. This was a checkbox field, so the value will be either 'true' or 'false'). Select the element that contains the custom field values.
The 'separator' field can be left blank - the default setting works. Then, we can 'Test & Review':

Then, you will see that this step will split up the custom field values into separate values that you can use in subsequent steps.
 .
.
6. Optional intermediary step: Filter
Often, you may not want to send all form submissions to a third party service. For instance, Wings Petition / Event / Donation forms have a tick box that asks users whether they want to stay updated. In this case, you will only want to send those users who opt in to a service like The Action Network or an email marketing service.
So, let's look at how to add a filter step by clicking the blue + sign, because we only want to subscribe persons who ticked the box that says they want to subscribe to the newsletter:

Alternatively, you can also filter based on a checkbox that was added as a custom field. In the previous step, we saw that we also had a checkbox that asks the user if they want to be added to a WhatsApp group. If you only want to filter based on whether they ticked that box, you can find this value in the 'Utilities' step we added. See the image:

- Click 'Only continue if...' to see a dropdown list of steps you can select
- Select the the Utilities step where we split up the custom fields
- Select the correct element that returns 'true' or 'false'.
If you click 'continue', you will be able to configure the last step.
7. Send the data to a third party service
The last step of a Zapier sequence is sending the data off to a third party service. In this example, we are sending the user submission to The Action Network.

Of course, you can also choose to connect any of the countless services supported by Zapier. If you use the intermediary filter step, you can create some smart integrations. Here are a few ideas:
- Create a Discord notification for every donation to notify activists that someone donated (be sure to not include identifiable information!)
- Create a Trello to-do card with a due date 2 days in the future and add a colleague as a card member, instructing them to send a personal thank you note to someone who donated more than $ 250
- Use the Gmail integration to send a personalized 'thank you' email to people who signed a petition, or use the intermediary 'Delay' step by Zapier to send a followup email to people who signed your petition 24 hours after they signed
Webhooks are a very powerful tool - experiment away!
Create a contact form with notifications via Zapier
Using webhooks, it is also possible to turn a signup campaign into a contact form that will send you an email notification.
To do this, create a Zapier zap that uses a webhook as a trigger to send an email:

Next, copy the webhook url (and click 'Continue'):

Then, go to your Wings project App settings and create a webhook:

- Choose 'Add webhook'
- Give your webhook a name
- Paste the webhook url Zapier gave you into this field
- Choose
submission.createdas a trigger. Alternatively, you could choose to only process form submissions after the user has confirmed it by clicking on the confirmation link in the email Wings will send them. - Save the webhook.
Then, create a Signup campaign that you will use as a contact form, and fill out the campaign form as a test.

Then head back to Zapier and click 'Test trigger':

Zapier will show you it has received the form submission. Next, we will set up a filter to only process zaps for this particular form – you may have other signup campaigns set up, and we want to create a notification that is only sent out if this contact form is used. We could look at the campaign title 'Contact form' but we could be a little more specific and use its ID, which is unique. You may have other forms set up in your project that you could also name 'Contact form', so this lets us be more precise and use the submission_projectId which we will use in a later step.

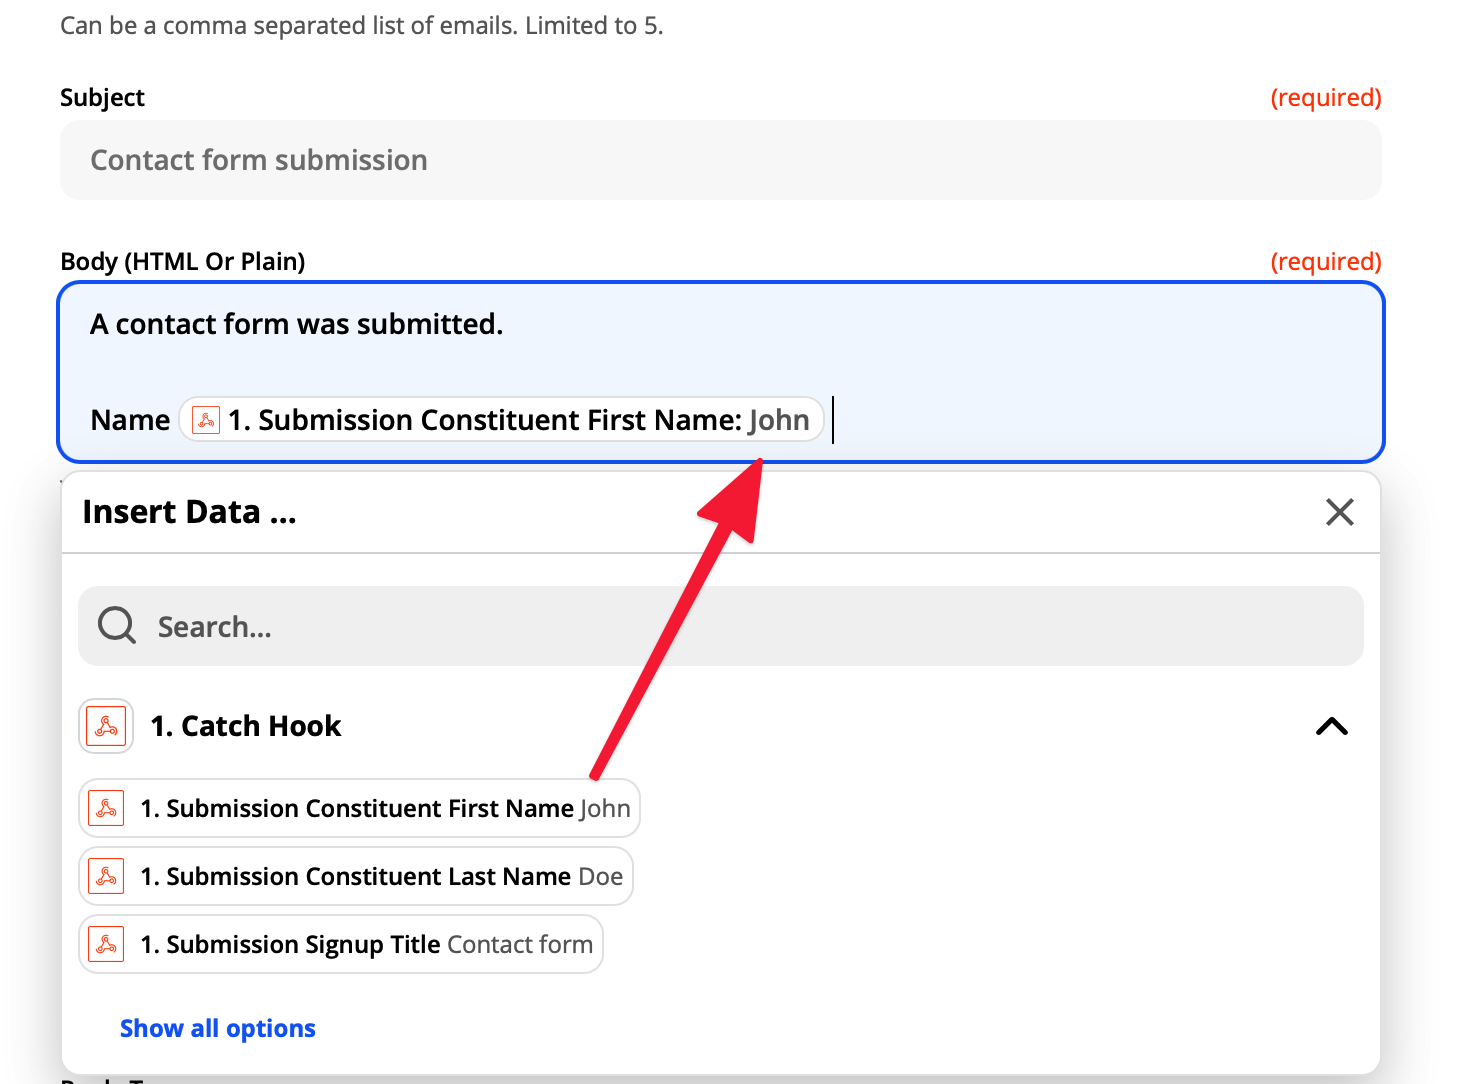
Click continue until you can configure the 'outbound email'. Then you will be able to configure the email notification. You can use all the information that Wings
After configuring the email, you should be able to activate this zap and try it out.
Use webhooks to process content updates
You can also use webhooks to send updates about the creation, modification and deletion of nodes (pages, articles, and campaigns) to third party services. You can easily find the right event triggers in your webhooks settings.
